 | |
| |
|
|
view titles only (low bandwidth) |
| |
| Is it too early for a New Year resolution? | Dec 29, 2012 8:26 AM PST | url |
| | | |
Added 1 new A* page:Man! When did days start taking me 26 hours? Hmph! Well I hope everyone else is surviving the holidays in a more timely fashion than I am. =P My project this weekend--to get myself back to more of a daylight schedule for next week...and then stick to it! Gotta start the new year right and all. :"P
|
·····
|
| |
| X-mas hangover, day two | Dec 28, 2012 10:14 AM PST | url |
| | | |
Added 1 new A* page:I'd probably still be poking at this except that my subconscious cleverly convinced me to satisfy some late-night cravings with the bulk of the chocolate-coated English toffee my brother got me for X-mas, whose inevitably divine sugar low permits of no further coherent drawing efforts. :P
|
·····
|
| |
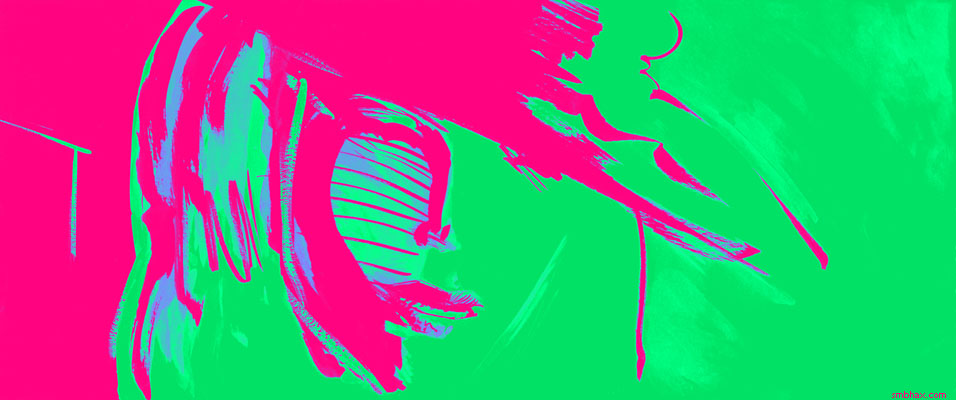
| Bilinear bipolarity | Dec 27, 2012 9:04 AM PST | url |
| | |
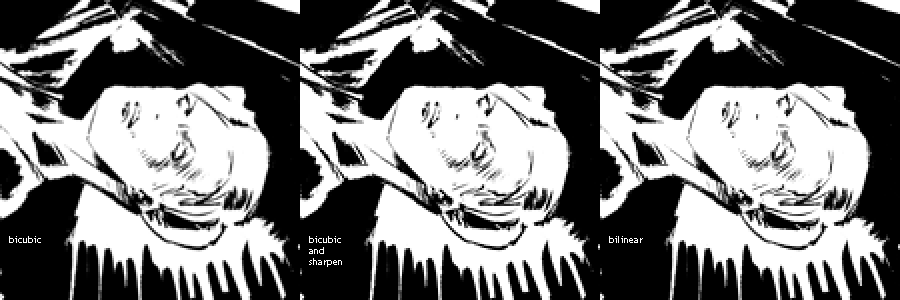
Added 1 new A* page:There's really no way you'd notice but I've lost way too much sleep fussing over this so I'm going to point out a little change I've made to the appearance of the comic in the past day or so (and back-applied it to two pages before that): I've gone back to something I was doing (and talked about at length) back in the digital days, namely using Photoshop's "bilinear" filtering option when shrinking the comic down to its web size from the source scan, rather than the usual "bicubic" setting.
The reason is that "bicubic" gives smoother but fuzzier results, with lines around 1 pixel in thickness getting pretty blurry. You can try to correct for that with a "sharpen" filter, but "sharpen" tends to emphasize the wrong things, create heightened contrast where you don't want it, and subtly make the whole thing a bit uncomfortable to look at. "Bilinear," on the other hand, yields results that are pixelated enough not to require sharpening--maybe they're a bit more pixelated than one might like at first glance, but they're more faithful to the original. Anyway I think the general result is easier to look at, especially in an image with lots of tiny lines, like some of the recent pages have had. Here's a 200% zoom comparison between the results of "bicubic," "bicubic" followed by a bit of "sharpen," and "bilinear"; notice, for instance, that even with "sharpen," small lines like Selenis' nose remain a bit blurry, and the lines in general all get pushed toward something of the same emphasis, subtly distorting the balance--that little white line in the background just above Selenis' face, for instance, gets brightened significantly after "sharpen," giving it too much emphasis:
I'd stopped using "bilinear" after going traditional, I think because with texture from the gray ink washes and fuzzier paper I was using initially, it was resulting in too much distracting pixelization throughout areas that were supposed to be flat. Now that I'm doing just pure black and white, though, "bilinear" doesn't disturb those fill areas.
~~~~~~~~
Ugh, looking back at the old digital days of the comic is always a little frustrating, since it's much easier to get sort of eh bold and stylish results with Photoshop's "Lasso Tool," as I was using it, vs dabbing ink on paper. Working traditionally has been much better ergonomically though, so I don't think I can go back to digital even if I totally wanted to. I just gotta...still got a long way to go in terms of capturing liveliness and dash in ink. I'm trying, for instance, to cut down on excessive cross-hatching, which tends to give everything a static or wishy-washy look (like yesterday's, oy), and to start to consolidate shapes into bolder sections of black and white--as is so utterly easy to do digitally with the Lasso Tool.
On the other hand, my actual drawing ability has improved quite a bit since going traditional, even if it isn't always immediately obvious; working digitally, I could just kind of keep cutting and moving things back and forth until they looked right--and after going traditional I realized that this had let me draw, for instance, parts of human anatomy that I didn't really know how to draw consciously! So I've had to learn to draw those things intentionally, which is good, but now I want to be able to recapture some of that feeling of tossing shapes around with wild abandon. Oh well maybe I'll figure something out.
~~~~~~~~
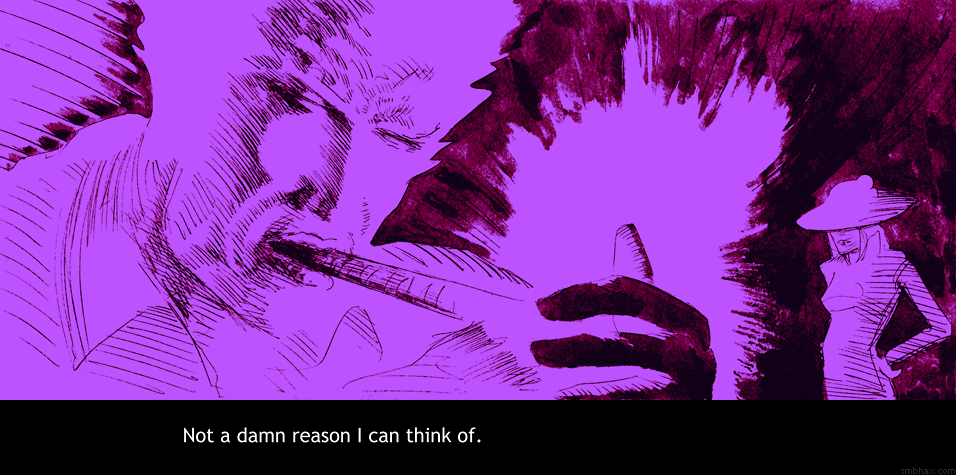
I'm grateful to an attentive reader for pointing out on Twitter that I forgot to put the bracketing colons around Selenis' last line of dialogue (page 31). I always appreciate having my boo-boos pointed out so I can go fix 'em!
|
·····
|
| |
| Ellison and Sinatra Starcrashing | Dec 26, 2012 4:33 AM PST | url |
| | |
Added 1 new A* page:Goodies from Christmas!
Now that the great Christmas Eve Netflix outage is over (thank goodness! :O), if you subscribe to their streaming service you've only got a few days left to check out the spaghetti sci-fi Star Wars wannabe train wreck that is Starcrash before it goes away on January 1st. I talked a bit about it last November
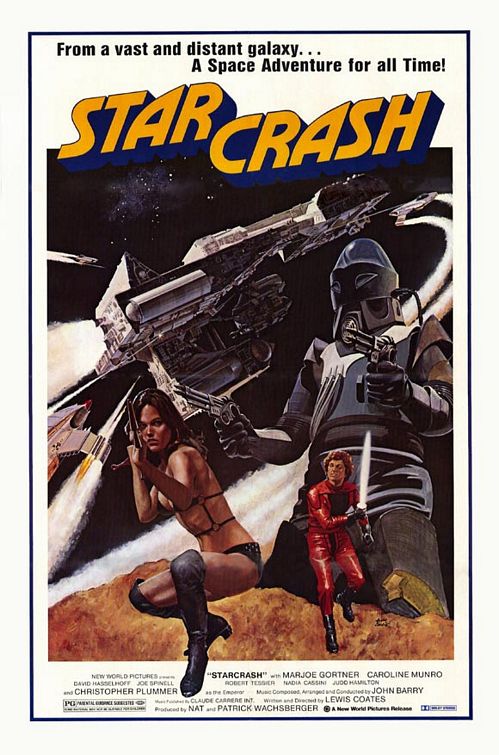
and *finally* sat down and watched it with this deadline looming, and man, the writing, acting, and editing are stunningly awful! Don't miss your chance of being able to boast of having survived a screening of this debacle! Not only is there incredibly nonsensical dialogue, and crummy stop-motion animation with light-sabers and David Hasselhoff, but it also features some pseudo science screamers, like firing torpedoes at the big bad guy's fist-shaped space fortress, except that instead of having them oh I don't know maybe just blow the thing up, you have them crash through the station's apparently plate glass windows—not causing any decompression because the concept of space being a vacuum seems to be completely unknown to the film makers—and skid to a stop on the floor—let's not even go into the gravity issue ;P—at which point one of your brave soldiers pops out of the torpedo's hollow body and is immediately gunned down by the bad guy's guards. Galactic prince David Hasselhoff can only watch in frustration as this brilliant attack stratagem of his father's somehow doesn't work out so well!
~~~~~~~
When I was looking up naval uniform and hat reference for the introduction of the Commander in today's comic, I came across a neat page with lots of photos of WWI US Naval uniforms. Check out them fancy dress uniforms!
~~~~~~~
Frank Sinatra Has a Cold is not only quite an interesting article, first published in Esquire in 1966, that documents some of the finer workings of the singer's mind and 75-man personal staff near the peak of Sinatra's power—the writer, Gay Talese, hadn't been able to wrangle his intended interview from the famously tight-lipped star, so instead he followed Sinatra and his coterie around, just observing from as close as he was allowed, and interviewing any staff members he could get—but its final composition sent a shockwave across the journalistic world, as it "became one of the most celebrated magazine stories ever published, a pioneering example of what came to be called New Journalism — a work of rigorously faithful fact enlivened with the kind of vivid storytelling that had previously been reserved for fiction"—although it should be noted that Talese came to dislike the "New Journalism" label, because in the hands of other writers it became something of an excuse for less-than-rigorously faithful reporting.
One incident observed and recorded in the article by Talese was a bar-room run-in between Sinatra and science fiction writer Harlan Ellison; Sinatra, not approving of the younger generation's casual evening attire, objected to Ellison's boots, and Ellison, never one to back down, objected to Sinatra's barbed questions—the end result being that Ellison was able to leave with his pride intact, although an order from Sinatra henceforth banned all those without suit and tie from the premises.
I came across this whole thing because I just watched the Star Trek episode "The City on the Edge of Forever," which, although it relies on time travel, has a much more interesting plot than most of the other episodes in the show's first season—and Ellison has the writing credit at the end. Ellison, of course, would find the "fatally inept treatment" of his screenplay—extensive re-writes by other writers having cut various subplots, among other things—enough of an excuse for legal action: he sued CBS Paramount over the episode 42 years later, in 2009.
|
·····
|
| |
| Who else got a space ship for Christmas? | Dec 25, 2012 3:31 AM PST | url |
| | | |
Added 1 new A* page:Merry Christmas if you like Christmas! I *think* I'll manage to keep getting pages done at the usual rate through these holidays, we'll see!
|
·····
|
| |
| Color is hard | Dec 22, 2012 8:29 AM PST | url |
| | |
Added 1 new A* page:After all the various color experiments of the past weeks, I think I've learned that I'll be better off sticking with black and white--at least, for the most part. That's the short version--read on for the blah-dee-blah thinking out loud long version!
~~~~~~~
Let's see, I scribbled out a checklist as thoughts on this began to occur to me last night... Ah okay first of all, I like black and white. It's got that old pulp feel, but more importantly, it forces me to concentrate on strong composition; I found that with color it's easy to think "oh well I'll just do some different color over here, that will help it stand out..." I like how black and white almost always verges on the abstract, with forms blending into each other in fun and unexpected ways. Plus, with black and white you don't have to worry about gamma levels and all that. :P
Before the color burst, with pages 14-16 of this episode, I'd felt like I'd really hit what I'd wanted to hit with black and white--in fact, I guess I felt like I also hit a plateau, and wasn't sure what to do with black and white next; I started thinking about how those compositions could be improved, and the main thought was a certain lack of depth distinction in the last two, and how returning to grayscale washes could solve that--but then I thought, I've been thinking about color, so if I'm going to start doing washes again, why not make them color washes?
Since then though, I've been reading the black and white Rip Kirby collection that a reader very generously got for me, and Alex Raymond's artwork in that has been giving me some good ideas on definite directions to go with black and white, and ways to solve some of the limitations I'd felt myself running into before. So now I really want to push on with the black and white and try some of that stuff out.
On the technical side of things, black and white has certain definite advantages from my point of view. Black and white image files are much more compact than color, so they download faster for readers. And when preparing a page for upload, with black and white I know exactly how much contrast its lines will have, and it has enough that it isn't necessary to run an artificial "Sharpen" filter on it after shrinking down the art to its web size; "Sharpen" can leave unsightly halo artifacts on the edges of things, so if you don't have to use it, that's a plus--also, I'm enough of a control freak that it was driving me nuts trying to find the right sharpen level to use for each new color page, because the contrast levels were constantly changing. :P All of which figures into perhaps the main technical advantage, which is that black and white takes much less time to produce than color; I've been consistently falling behind in my daily schedule since I jumped into color, and me being tired and stressed from time pinching all the time doesn't really help the comic.
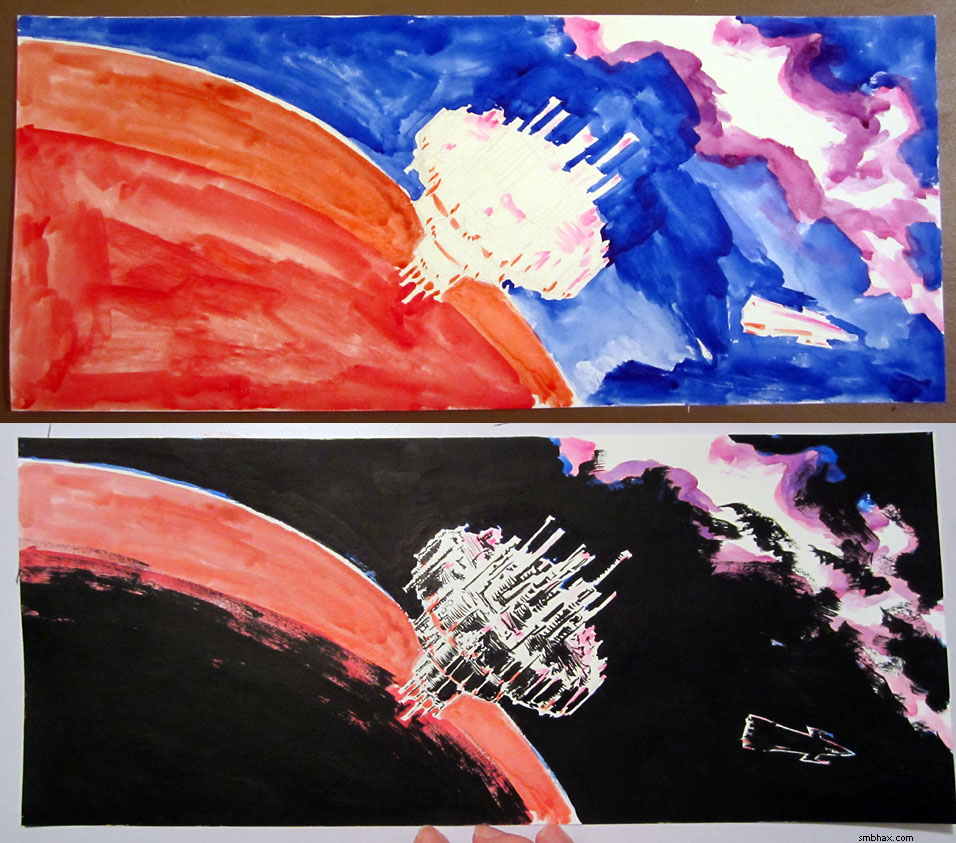
Coming to the color itself, I didn't want to do regular comic flat color, because well that's kind of boring; so I'd decided to do limited, semi-abstract color, but I think I found that I lack the discipline to do that really consistently. Maybe I could get to that eventually, but at the moment the results of trying to force myself into that are not very satisfying--or not a clear victory over just black and white, at least. I learned a lot doing it, and I now have the equipment to produce color images should I need to, so I'm glad about that, but I think I probably shouldn't be trying to shoehorn it into every page. And I'm not really convinced of the effectiveness of throwing colors over my inks; on the other hand, I know from my old oil painting experience that I can do okay with fully painted color, so maybe I'll keep an eye out for an opportunity to try an all-out watercolor page at some point--could work well for a soft focus close-up portrait shot, for instance (here's an example of someone much more skilled than I using watercolor that way, although I think they also used something non-watercolor to add definition to the facial features). I can also see myself using it for a special jump-out-at-you highlight; looking back, for instance, I think one of the more effective things I did was painting the guard in yellow on page 28--I suppose I cribbed that straight from Frank Miller's That Yellow Bastard story in his Sin City comic series. Seems to work pretty well, but that's something that works well only when used very sparingly.
(Oh, and I happened to notice that the pink and blue color scheme I seemed fixated on looked remarkably similar to the super-saturated color in early color (or colorized?) photos, such as this one of Rita Hayworth in 1946. :)
Probably my favorite thing about this color adventure was all the discussion it sparked with readers--I didn't expect it to generate as much talk as it did, so that was exciting. It's a funny thing; I think overall the number of people out there on the internet who will sit and read a color comic is much larger than the number who will sit and read a black and white comic; I not too infrequently see comments from readers on other sites that make it clear that anything without color is more or less invisible to them. So I'll admit I did have in the back of my mind the thought that adding color could help A* reach more readers--and the fact that my TWC vote ranking jumped from the low 300s, where it's been for months, to the high 200s with the advent of the color pages did seem to support that notion, although I suppose that could just have been coincidence. But it's also clear that the readers who've stuck with A* have done so because they like--or at least can tolerate--black and white comics, so in that regard adding color isn't necessarily an automatic bonus.
And finally, I just feel more comfortable with A* in black and white. So I'll see what I can do with it while staying--for the most part--within that constraint for the time being.
~~~~~~~~
If you've read all this way for some reason, here are some videos to enjoy! Or not, since this first one is an Air Force public relations video from about 1960 advertising their use of animals--bears and chimpanzees--as test subjects in the development of ejection seats for the first sustained supersonic jet bomber, the B-58 Hustler; the narrator's chipper description of crash injuries to the poor bears--who certainly didn't sign up for being rocketed out of a jet at high altitude while moving at Mach 1.3+--is really pretty chilling. :| The earlier video in that series may also be of interest, though--no bear torturing in that one, but rather a surprisingly lengthy animation of the jet's fairly unique ejection system, which encased the crew member in a completely enveloping, armored and pressurized survival pod.
And if you really need a serious cheering up after all that, this next video can't fail, because it's Leonard Nimoy singing the Ballad of Bilbo Baggins in full Spock hairdo, since it happened in 1967 while he was filming the second season of the original Star Trek series. I haven't seen the new live-action Hobbit movie, but I really can't imagine it being able to top this.
|
·····
|
| |
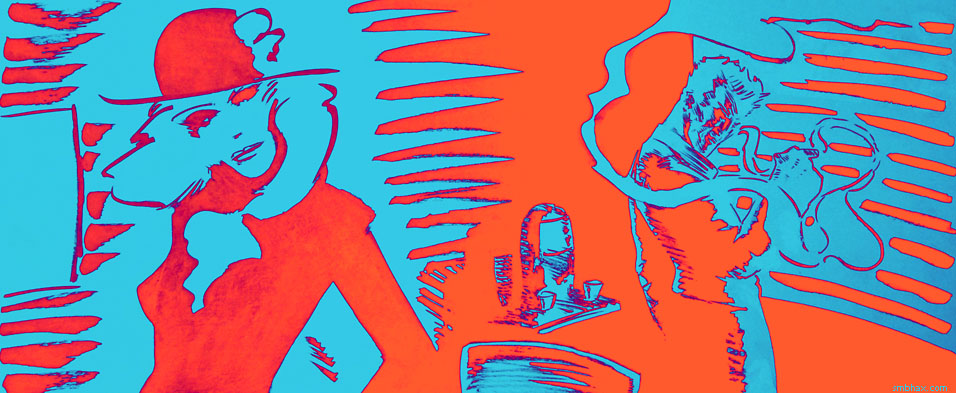
| Can color make black and white stronger? | Dec 21, 2012 7:32 AM PST | url |
| | |
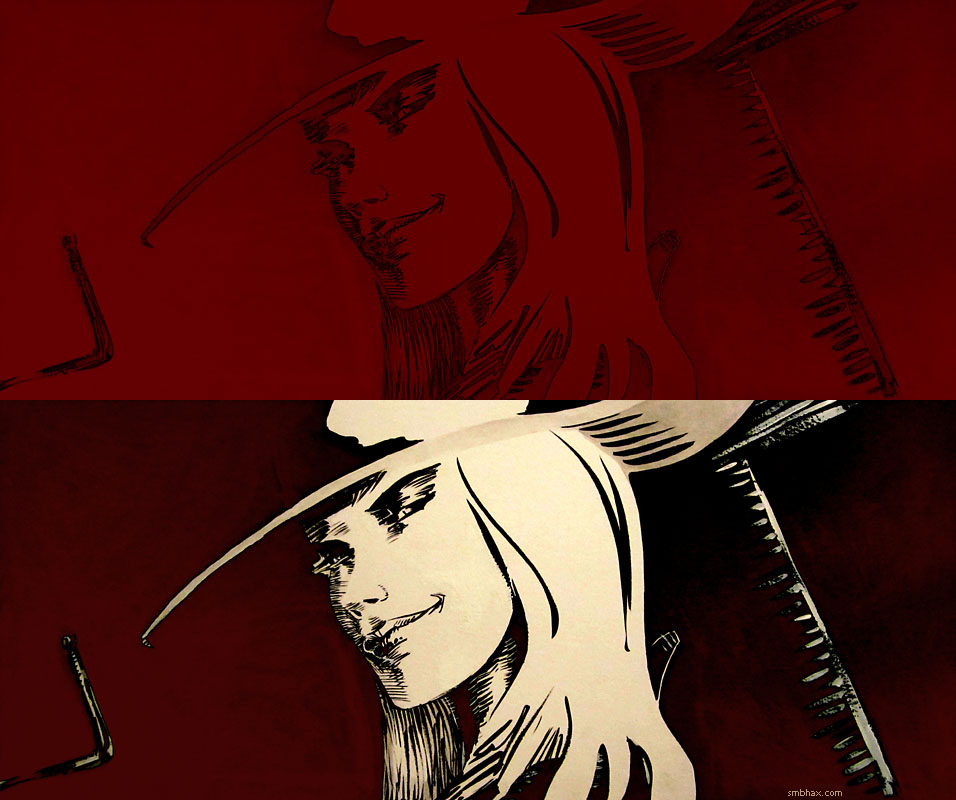
Added 1 new A* page:Trying to rein in all the color experimentation I've been doing and start to hone it to something sharper. Since I realized a few days ago that I can do the watercolors *over* the inks without getting either one muddled up--rather than doing the watercolor first, then inking over that--I've been trying to ink the page as best I can as a stand-alone thing--as if it was going to go out as pure black and white, I mean--and once that's done, consider what color can do to help the black and white get its message across. How to limit the color was confuddling me at first but I think I'm starting to get the picture.
I've also been trying to work on the black and white itself, keeping the linework light and brisk, and contrasting that against thick, rough shadows--ideas I've been getting from the Rip Kirby strips I've been looking at, primarily. Yesterday didn't seem to work that well but I think today's was more successful in that regard. Here are a couple progress stages in the inking:
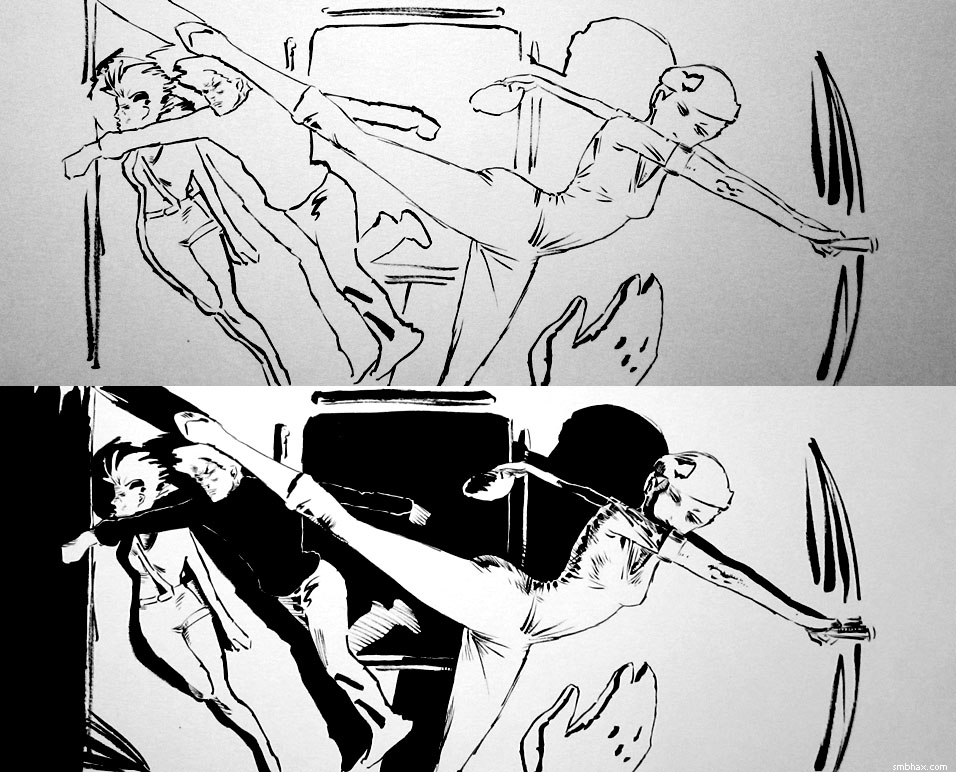
This particular sequence with four characters per panel across a long expanse of corridor has been interesting with regards to the role of color, because it's seemed to me to be pretty darn tough to get the sense of the corridor's depth or extent across in just black and white; and I think even grayscale would struggle with it, because while with grays you can pretty easily illustrate near vs far, you can't very easily do another dimension along with that, and with all these characters I've needed near vs far AND left vs right, if that makes sense. So I'm finding the color can take care of that extra dimension. Compare, for instance, the feeling of the pre-watercolor version of the page in the image just above with the final, colored version, and I hopefully you'll be able to see a bit of that extra dimension or two I'm talking about.
My color use still has a long way to go, but the goal is to have it accentuate the black and white, rather than diminish it--hm and hopefully I'm not just using it as a crutch for lazy composition!
~~~~~
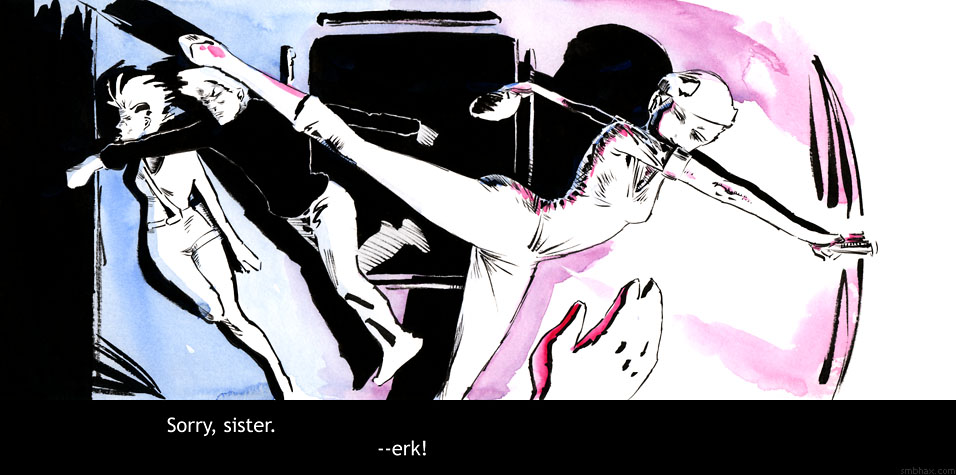
UPDATE: Having said all that, and sitting here flipping back and forth between the color and black and white versions... I think I like this page better in black and white. There's a power about it, particularly the left side between the Major and the guard. And while it's easier to lose track of depth in black and white, that's also part of the abstraction I like about black and white. Hm. So for now I've replaced the colored version of the page with the black and white. Here's the color one; which do you prefer?
|
·····
|
| |
| Gosh, gouache! | Dec 20, 2012 7:04 AM PST | url |
| | |
Added 1 new A* page:Wooo color's still all over the place, but I'm learning loads of stuff. My gouache came today! Gouache, rather disappointingly pronounced just "gwash," is opaque watercolor, which is handy because it's nice and smooth to mix and lay down, and can cover up stuff beneath it, like acrylic or oil paint. You can do big bold color stuff with it, kinda like some of the two-tone color stuff I did a week or so ago when I was trying digital color. So I was excited to try a bit of it out, and I finally had a reason to in working on today's page, because the left side of the hand in the foreground came out kinda pebbly in the regular magenta watercolor I used there. I matched the shade with gouache and laid it in nice and smooth...well and it would have been smoother only I second-guessed myself and crosshatched over it with ink, then decided that was dumb and painted back over it with remixed gouache. Finally that was all set and I scanned it and discovered something--that gouache "Opera Pink" does not pick up well in my scanner!
For instance here's a photo of the little scrub test palette I've been making with regular watercolors (upper rows) and gouache (lower row), above a scan of the same piece of paper; keep an eye on what happens to the "Opera Pink," second from left at the bottom, in the scanned version:
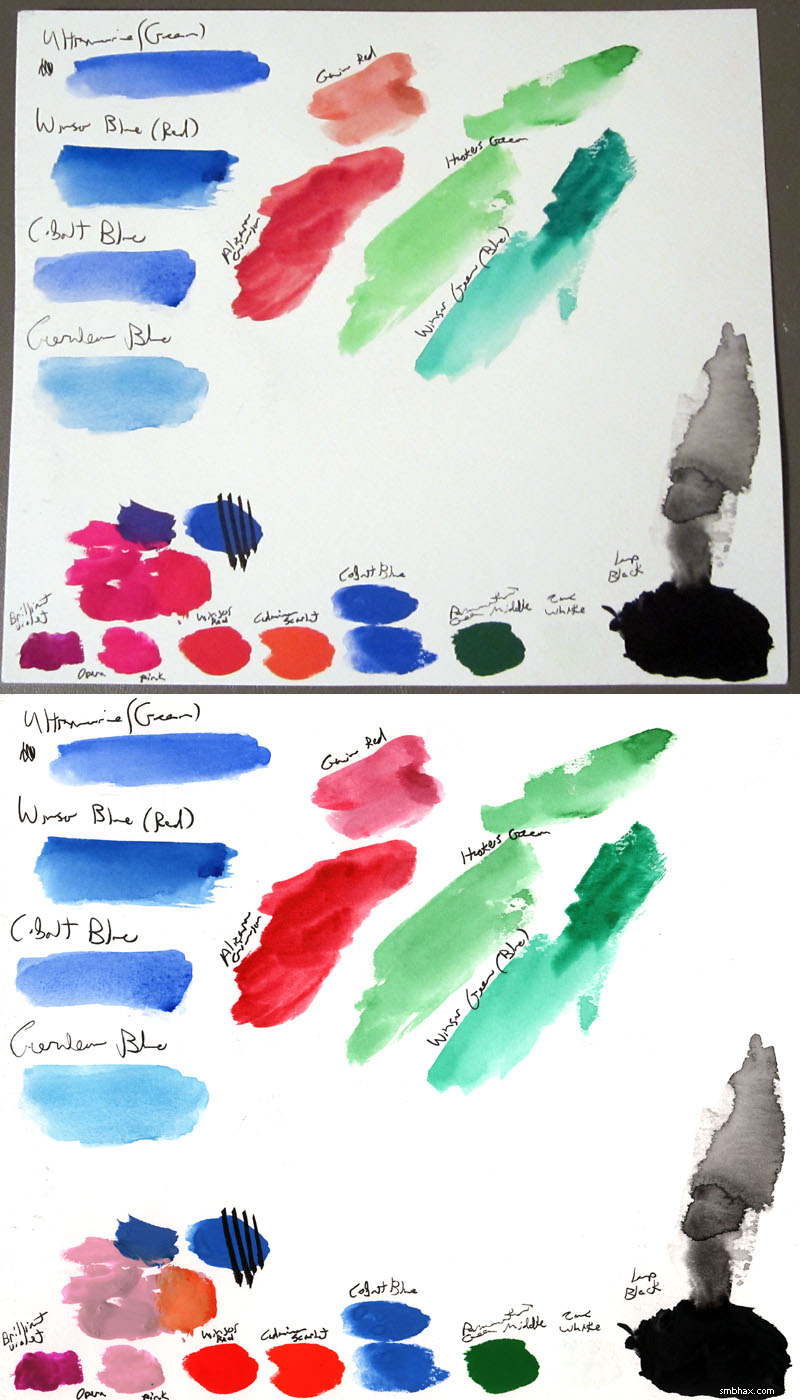
Ack! Also the red and orange got too close together, but man, the pink just isn't picked up by my scanner at all. Weird. So I had to fix it in Photoshop for today's page...but I'll have to find some other pink/magenta/red/orange solutions if I'm gonna be able to use gouache. HM. I have Ultramarine (an intense deep blue) and yellow coming tomorrow, so hopefully I can mix up some suitable--and scannable--blends with them; otherwise I may have to chance ordering some alternate hues and hoping they scan okay. :P
|
·····
|
| |
| Khaaaaaaaaaaan! | Dec 19, 2012 4:54 AM PST | url |
| | | |
Added 1 new A* page:Well the news today is that my orange and yellow watercolors came. :) And apparently I like pink, or, specifically, Quinacridone Magenta. Ooh and I just got to the episode of the original Star Trek I'm watching on Netflix where they awaken Khan. Exciting! Also I have to go to bed. :P
|
·····
|
| |
| The rocket-assisted Stratojet! | Dec 18, 2012 2:25 AM PST | url |
| | |
Added 1 new A* page:So per the dialogue in the previous page, this ship Selenis and the Major are trying to get to is the "XA-47." It took me some time to find a name that short that didn't Google up a ton of stuff. XA-47 finally tested fairly clean--but an XB-47, as it happens, was the designation of the prototype version of the B-47 Stratojet, a jet-propelled USAF bomber; the first XB-47 flew in 1947 (from Boeing Field in Seattle, woo) (oh and I think the "XB-47" in '47 was a coincidence :P). Their swept-wing design was revolutionary for bombers, and their overall design was a major innovation that would lead to the commercial jet airliners we see today. The 2000+ B-47s built, designed to drop nuclear bombs on the Soviet Union, never saw combat as bombers (thank goodness!!), but they were used extensively for reconnaissance, and a total of three were shot down by Russian MiG fighters while engaging in high-altitude snooping or the like over several decades of service.
Several variants of the B-47 were equipped with rocket boosters for extra-short takeoffs, and that's really why I'm making this post--because they just look so darn cool taking off with those boosters! These are B-47Es:
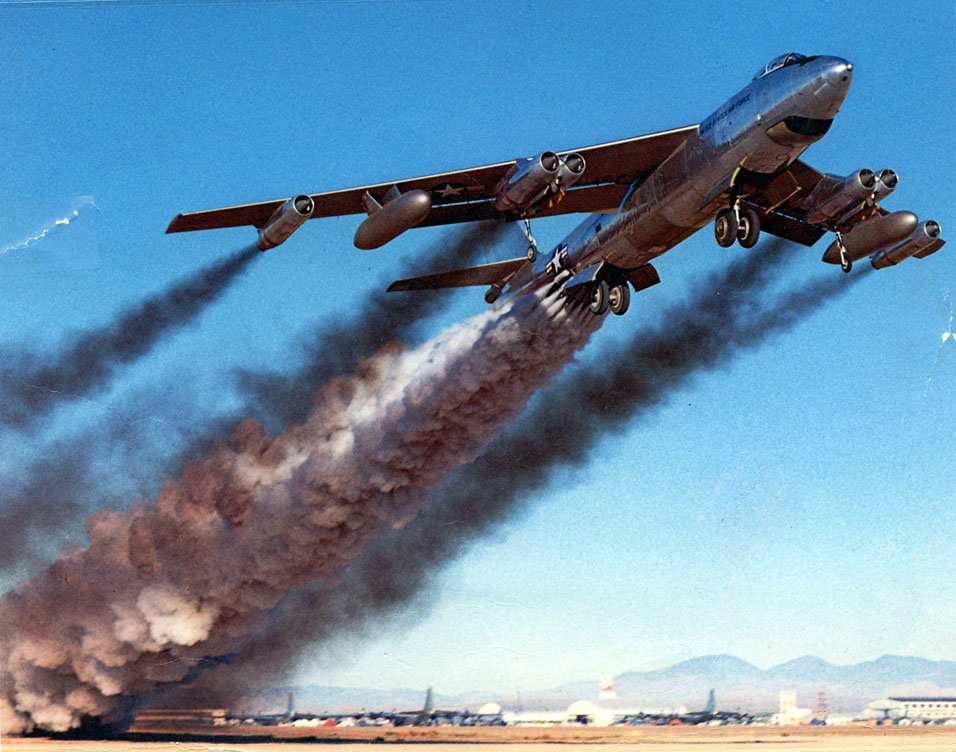
image by US Government (source)
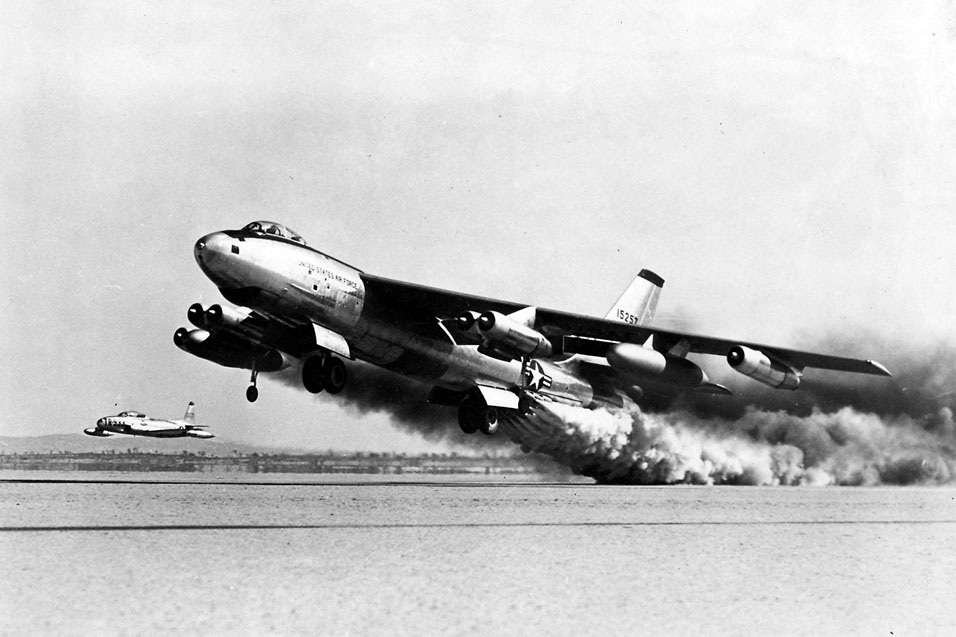
image by USAF (source)
Fwoosh!
|
·····
|
| |
| Alex Raymond's Rip Kirby | Dec 15, 2012 11:02 AM PST | url |
| | |
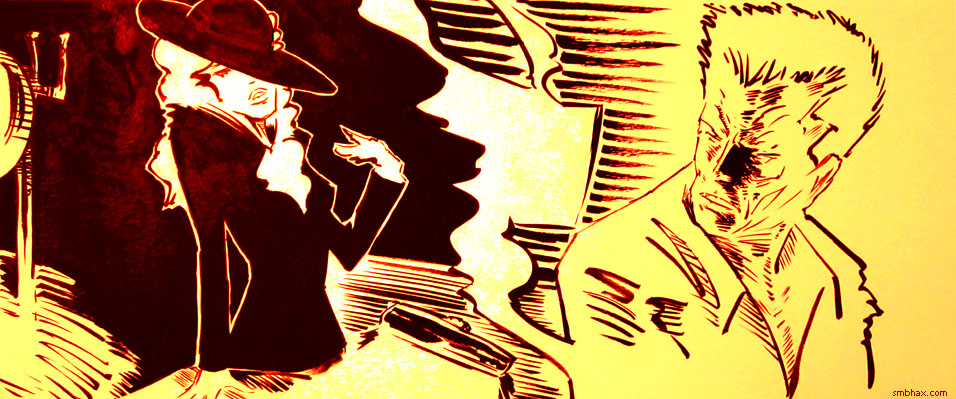
Added 1 new A* page:I've talked about comic strip artist Alex Raymond before, and specifically about his invention and work on what would become one of the most successful strips of its day, Flash Gordon. Well, thanks to the amazing generosity of an A* reader who knocked the last item off A*'s Amazon Wish List, I can now show you something of Raymond's later strip, Rip Kirby.
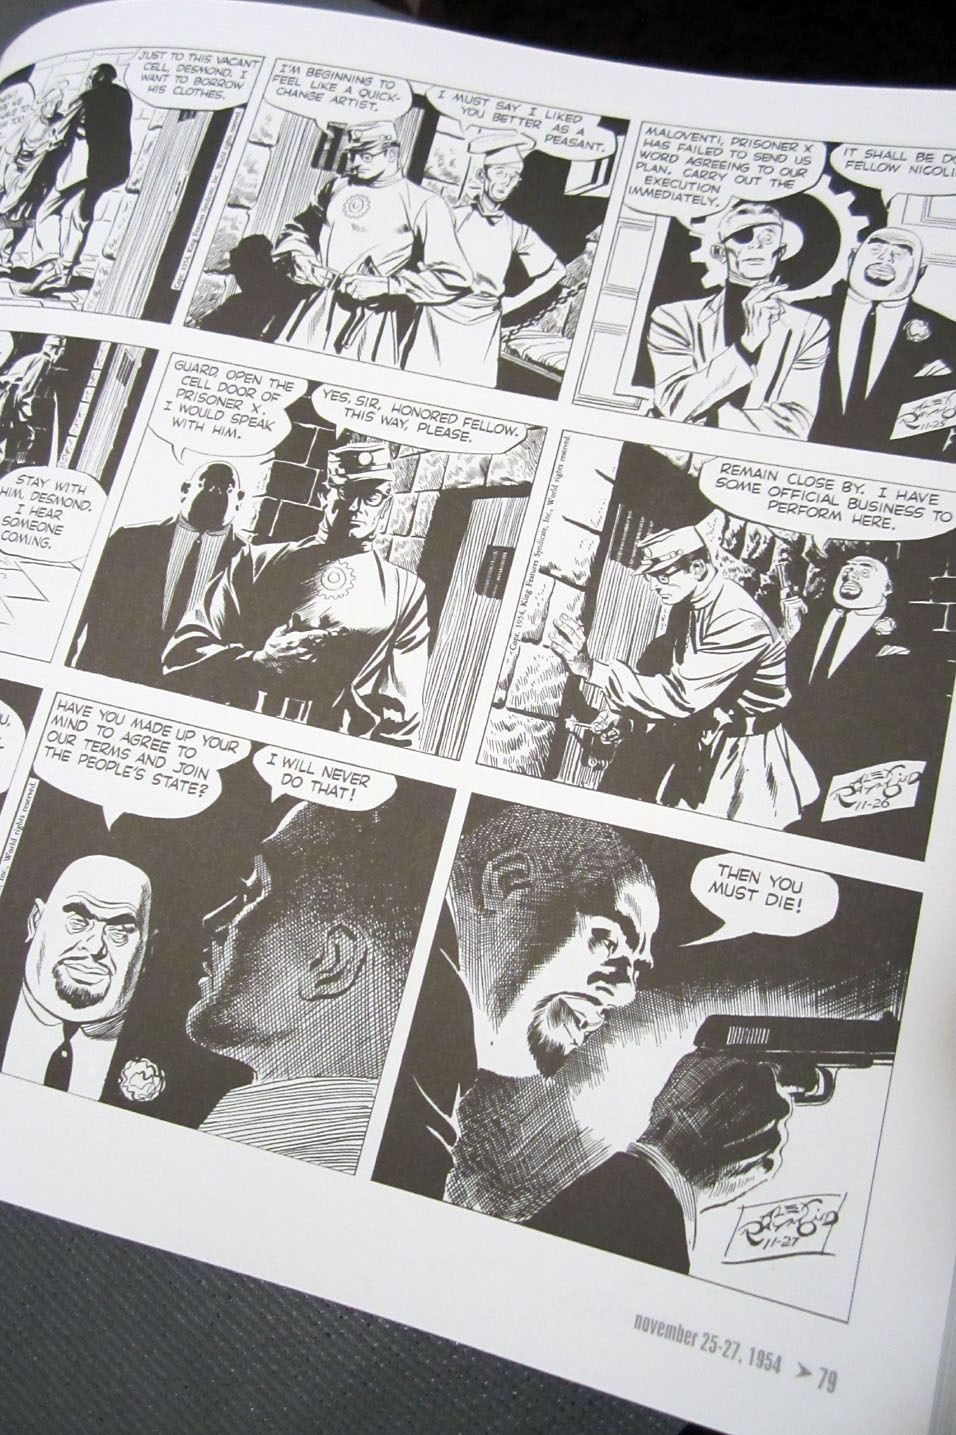
Flash was a large format, weekly color strip, but Rip, which Raymond began after returning from service in WWII and finding Flash reassigned to another artist, was in the daily black and white, three-panel format you see in papers these days. Not having to leave space for someone to color over his illustrations, Raymond could make full use of deep black shadows, and the graceful cross-hatching he so enjoyed. He also determined to modernize his style: where Flash's graceful, curving pre-war look was replaced by incisive, angular lines contrasted against thick, quick brushed effects; in Rip he would often forgo the use of outlines, instead letting the surrounding shading define his forms for a much more impressionistic look than typically seen in comics. And if the sharp, "modern" look of the strip looks similar to other serial comics you may still see in the funny pages, that's because this style, invented by Raymond, became quite popular among other comic artists who saw his work—but Rip is the strip that invented it.
The book my wonderful reader had sent to me is Rip Kirby Volume 4, the last volume in IDW's recent collection that covers Raymond's work on the strip—from 1954 to 1956, when Raymond's obsession with sports cars—he'd bought six in six years!—tragically caught up with him in a friend's car on a slick, rainy road. The print quality is generally pretty good, although the ink isn't the absolute darkest (I suppose I only notice this because I obsess about ink these days), and some strips here and there are slightly rougher than others; I wonder if they just couldn't find high-quality surviving versions of those.
Here's a dark night sequence where Raymond really got to indulge his love of hatching; the headlight glare effect in the first panel, of which I thoughtlessly cut off half, is a particularly striking piece of design work:

Notice how the shading in this prison sequence gradually gets more and more sinister:
I particularly like the abstraction of the shading in this strip:
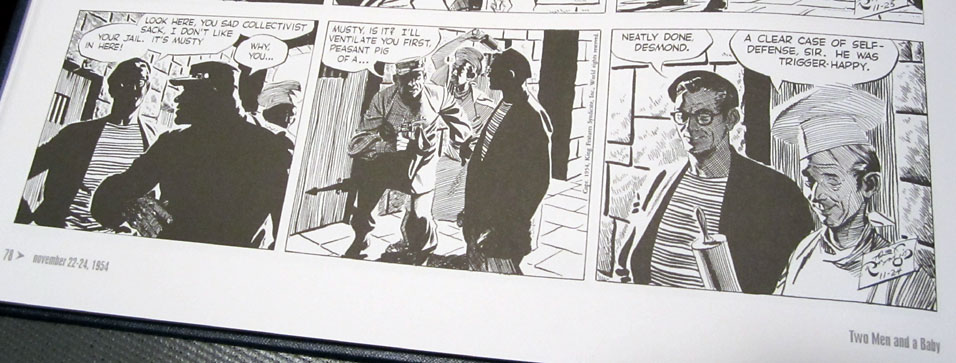
So this is pretty near to the ultimate in terms of black and white strip work as far as I'm concerned! I'm learning something from pretty much every panel I take the time to examine closely.
The writing—mostly by Raymond's collaborator, Fred Dickinson, I think—in the one story I've got through so far is not so impressive as the art—a pretty contrived love triangle type of thing. The dialogue is sometimes funny, maybe in an unintentional way. For instance, here's washed-up actor Byron Delight, aka "The Grand Passion" (hm!) trying to stay current:
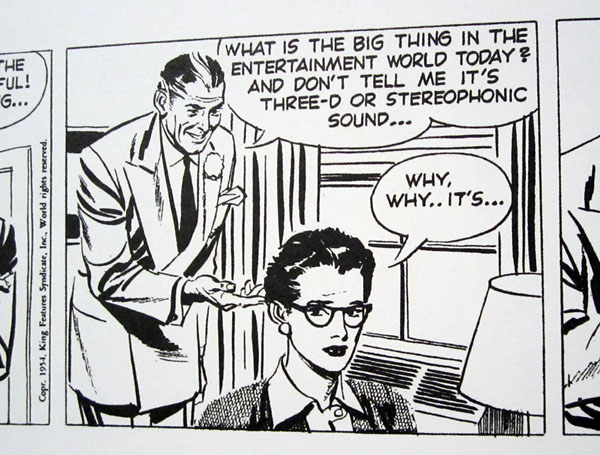
Maybe he isn't so out of it, after all! Anyway it's a fantastic book to study for adventure comic strip art, and I'm extremely grateful that I have readers who help me acquire these lovely things. :) Thank you! And thanks, of course, for reading this little A* comic. :))
|
·····
|
| |
| Computer color's hard, just gimme a brush | Dec 14, 2012 12:32 AM PST | url |
| | |
Added 1 new A* page:Just when I thought I'd tried all the color stuff I was gonna try...here's some actual watercolor for you. :P Some of the drawing steps:
'Cause see I got the urge to run a few more computer color tests, and it turned out that the photo method I used for instance with yesterday's page doesn't *quite* have the sharpness I'd like it to have sometimes, especially toward the edges of the image--it worked pretty well with yesterday's page, but that was you know sort of a soft-focus glamour type portrait shot; for other stuff it has trouble. So I thought I'd have to work up artificial color from scans, but that's actually pretty tough to do from a nice flat, clean scan of a black and white image; you need to add gray washes for gradient maps to have something to work with, for instance, and I don't want to have to add washes to every image necessarily. So finally I figured heck it'll be easier just to paint the darn things in actual color myself. :P
My palette is currently lacking yellow and orange, since when I was putting together a tiny palette with the idea of doing abstract color, I thought well those are gross colors, who needs 'em; but if you look back through the last week and a half of artificial colors I've been doing, you'll see I discovered I actually like using yellow and orange. :P So I've rush-ordered some...also some more blues--although just after I placed that order I found the first blue I got is pretty darn good, you just really have to load up the brush with it--and hmm ah a cadmium red is on the way as well. These are Winsor & Newton artist watercolor half-pans. Excitement with toxic chemicals!
|
·····
|
| |
| Supermassive Colorocalypse | Dec 13, 2012 2:28 PM PST | url |
| | |
Added 1 new A* page:Some of the steps in the coloring fun:
And here's a photo of the pencil stage with mockup shading drawn over it digitally as a test; the shading values didn't really come out like this, I guess that light wash I used was just too light and instead of trying a second, darker wash over it, I settled for hatched lines:

Did I mention this is a high-bandwidth, high-color post? Because it is. I ran a bunch of color tests today before starting on page 24; for a few of them (and page 24) I used the "Gradient Map" adjustment function in Photoshop; the ancient PS 4 I usually use doesn't have it, but I found it in my more recent PS CS2 after it was pointed out to me by a kindly reader on tumblr.
Test coloring an old page (ep 17, page 80) using Gradient Map--smooth!:
Simpler coloring scheme for a scanned version of yesterday's page; I kind of like the look, except that the pencil lines don't scan well and come out looking pretty scrubby, and the side of the Major's head, with just thin lines to cover it, gives me a bit of horror vacui; I should'a had the stones to put some shading on it:
I began to suspect that pencil lines are just too faint or impermanent to make reliable scanning subjects, and that my attempts of working from photos had had problems with fuzziness because the pencil and light wash pages were just too low-contrast for the camera to see well. That page 17:80 above was one I wanted to test coloring because it has thin *ink* lines, and I wanted to see how those would hold up under color, as a switch from pencil lines. I also color-tested some other higher-contrast stuff, including something you haven't exactly seen yet but which may look familiar:
That's a gradient re-mapped photo of the final version of the piece of which a photo of an early stage--before full black inks were added--was used for the first of this current string of color A* pages, page 18:17. I'd been mad with myself over dousing the nice early, light shading job with more shading washes.
The colors chosen for the gradient map just came out of throwing layers with various blending modes over the original art--these color sometimes come out a little dull from all the mixing, so it's nice to be able to recreate and tweak them using a fresh Gradient Map. Here was the earlier version, with colors just from a lot of layer mixes:
I also tested that color mix on a scanned version of the drawing; it doesn't have the natural lighting gradient of the photo, so it comes out flatter and a little less interesting, I think:
And an alternate Gradient Map, slightly less wacky coloring scheme, in fact since it keeps black and black and white as white, this is downright conservative by the standards of the other stuff I've been doing :P:

And I tried coloring some older stuff heretofore seen only in black and white. Here's a color test of a photo of page 18:15, to see what kind of color I could get out of a pure black and white page with no gray washes on it; the lighting on the page itself when I take the photo gives a tiny bit of volume to what would otherwise be an entirely flat two-color thing:
And similarly, a color test of page 18:16--this one was strictly black and white, but also had some white ink corrections on it, and I wanted to make sure those wouldn't show up too badly in the photo--rather surprisingly they really didn't:
So that's about it for now. What all this showed me was that a) if I want nice lines I'll probably have to stick to brushed, pure black ink lines, but b) I don't really have the patience to do a lot of thin lines with a brush, c) a bit of gray wash in there helps give a hook to getting a more than two basic colors out of full-page coloring filters, d) using subject pages of sufficiently high contrast, the photographed pages come out pretty much as sharp as the scanned ones, and have some interesting natural surface effects to boot--pretty much like 'em better than the scans, and e) the Gradient Map function is pretty handy for finalizing colors.
We start a new scene tomorrow, and I since I've had a chance now to try out pretty much all the color tricks I can think of currently, maybe this'll be a good point at which to start being a little less obtrusive with the color--unless the subject requires eye-injuring color, of course.
|
·····
|
| |
| Candid photos of men with cigars | Dec 12, 2012 11:00 AM PST | url |
| | |
Added 1 new A* page:I meant to have an actual topical blog post but I managed to waste all my time trying to get some interesting color out of a scan of the drawing for today's page, which just didn't seem to want to work for me--so in the end I went back to snapping a photo and working from that, which let me take advantage of the natural light highlight on the paper.
I was thinking last week that I couldn't keep doing this photo process unless I got a really nice digital camera--to make them come out a bit sharper and less mungy, you know--but a casual glance at the web site for the local electronics superstore shows me that I could spend a ridiculous amount of money for cameras that have the same or just marginally better or even worse resolution than the little Canon PowerShot ELPH 100 HS I've been using for A* photo duties all along. Huh. Oh well, maybe I'll figure out some tricks for processing them sharper in Photoshop.
Here's as far as I got with trying to squeeze colors out of the scanned version...blug:
The real trouble I'm having with accepting the scanned versions is that the scanner--and I knew this from a previous experiment--does not pick up pencil very well; I think the light is reflecting and speckling off graphite grains or something, but anyway the pencil lines come out pretty gritty looking.
Of course what I should be using for line work is a dip pen, aka nib pen or crowquill pen, namely one where you dip a finely forked metal tip into ink and then scratch it along the page, which presses the tines of the tip apart slightly, allowing a little drop of ink to run down the little channel where they separate, and onto the page to form a nice smooth line...but I haven't much liked dip pens the few times I've tried to mess with them; they're messy, prone to breaking (and those needle-like tines can shoot off anywhere! :o), they scratch the heck out of the surface of the paper (often pulling up a little tuft of paper between the tines that you have to remove with your fingers before you can go back to drawing with it), and their blade-like tips only like moving a certain direction across the page, which really puts a damper on how you can draw with 'em, and makes me kill my wrist, because I hate turning the page to draw upside-down just so the quill can move the direction it likes for a given line. Ugh.
So if I can get pencil lines to act like pen lines, that'd be swell. My scanner doesn't much care for 'em, though. I've read of professional comic artists who scan their stuff and just adjust the pencils really dark in Photoshop so they look like pen, and appear to be able to do that without the speckly scan problem I'm having... Hm. Oh! Maybe I should scan in black and white rather than grayscale. I'll hafta try that. ... No wait that won't really work 'cause I have a gray wash over it. Oh well maybe I'll try anyway just so I *know*.
|
·····
|
| |
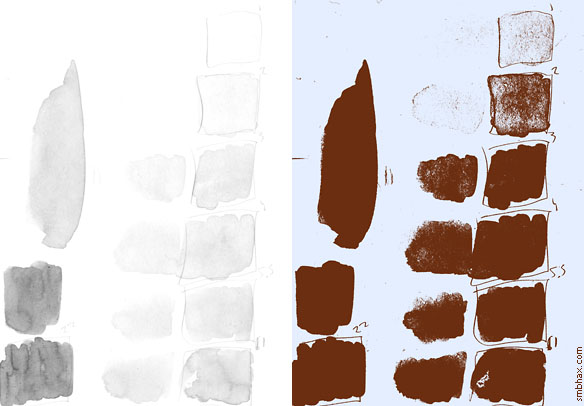
| An ink to water ratio of 1:400 | Dec 11, 2012 7:11 AM PST | url |
| | |
Added 1 new A* page:For some reason, when I made a mistaken journey into color at the beginning of last week, I really latched on to drawing the pages with very light ink wash--much lighter than the pencil lines I'm putting it over. I think maybe it works for me because it's so light I can't see it well enough to obsess about its details prior to scanning it, so I just lay it on and get it done.
But I second-guessed that to start this week, thinking that if I just went with a slightly darker wash, I could get it to go full black (or whatever darker color I choose) rather than being light and dithery in spots when I process it. So I did a careful pencil drawing of Selenis' face over a period of some hours, kept twiddling at it now and then, and finally started in with a darker wash that had shown itself capable of coming out nice and solid in Photoshop. Well, it was a disaster. Part of that was probably due to the drawing being stiff--ah, Mondays--but I think also it was just that with the darker wash I could see it well enough to start worrying about it and second-guessing its placement. So anyhow I had to scrap that one and get something done fast, so I went back to the lighter wash, and--maybe just now that I was warmed up, who knows--was able to knock out the page you see today fairly quickly. Yeah it is a bit scrappy but that's what I get for wasting most of my drawing time today on a dead end.
Here's the ink processing test I did when trying to find the "ideal" ink wash concentration; the numbers are drops of black ink per little jar of water, each jar holding about 2200 drops of total fluid. 5.5 is the mix I've been using for the light wash; I was looking at 1 and 2 as possibilities for a sort of magic automatic gray/dither tone, and then at 22 as the one to use for solids--that's the one that turned out to be too dark for my picky self to work with without fretting, so it's back to the ol' 5.5 for now:
(I know this is probably frightfully boring but I'm in a rush to bed! =o)
I got a great amount of very earnest feedback on this whole color business in response to the question I put in the previous blog entry--more feedback than I'd dared to hope to expect, in fact, so that was really encouraging and very helpful, and thanks very much to everyone who took the time to write in and give me your thoughts on the matter! The responses were incredibly varied in terms of what type of color or non-color scheme readers preferred, but they were all positive and convincingly heartfelt, and I just can't tell you how nice it is to get such a response. :) I'm still far from certain how this color jaunt will end up, and I suppose the odds are against me being able to meet everyone's exact preference, whatever the outcome, but at least now I'll *know* what preferences I'm not meeting, which is just as useful as the other way around--from my point of view as the self-appointed (nobody else wanted the job at the time, I swear!) A* art dictator, at least.
So I'm not sure exactly even how tomorrow's page will look (that would be boring to know in advance anyway, psh), but I'll try at least to keep things interesting, and uh hm maybe even not have an art disaster quite every *single* day, even! ... I suppose I can't make any promises on that last part though. :o
(Incidentally, for those of you out there better at Photoshop than me, aside from the colors, the processing I did on that ink wash sample, for instance, to get the grays to a solid thing was just to drop a maxed-black Levels layer (253, 1, 255) over them.)
|
·····
|
| |
| My comic color conundrum! | Dec 08, 2012 12:06 AM PST | url |
| | |
Added 1 new A* page:Man, color! I think my coloring brain cells are blown out now. =P
Today's page comes from a scan of the artwork, rather than a photo. I tried a photo at first, but this was about as close as I could get to getting it legible:
My color tricks couldn't really solidify it beyond that because the lines on the right side were lighter than the lightest areas on the left side, which means a simple filter can't grab all the lines effectively. Blargle argle! Anyway contrast that effort with the final page from the scan:
I've been wishing and washing on this scan vs photo thing all day; I even had a scanned version of the previous day's page up at one point
because the photo version
had a lot of blur and fuzz that was nagging at me. It's got that cool natural lighting gradient, though. Hm! Gar! I think I'm gonna go have a weekend of doing non-coloring stuff. ;|
So what do you think of all this coloring hoohah? Should I stick with this or that, or none of the above? Lemme know! You can message me by email, Twitter, Facebook, etc etc--all those links are under the "about" link on the site's top menu.
|
·····
|
| |
| Getting two colors out of one in Photoshop | Dec 07, 2012 8:43 AM PST | url |
| | |
Added 1 new A* page:Conjuring up some color was a little more straightforward today. Like yesterday, the main trick was establishing a secondary color; this time, it was a layer in "Difference" mode that did the trick (yesterday the mode was "Hard Light"):
(Update: added some final highlights and lowlights with Threshold layers set to Screen and Multiply, respectively.)
Here's the first pencil layout I did--but in the end it seemed too boring, and also too similar to page 14:
|
·····
|
| |
| O the colors, children! 8o | Dec 06, 2012 7:30 AM PST | url |
| | |
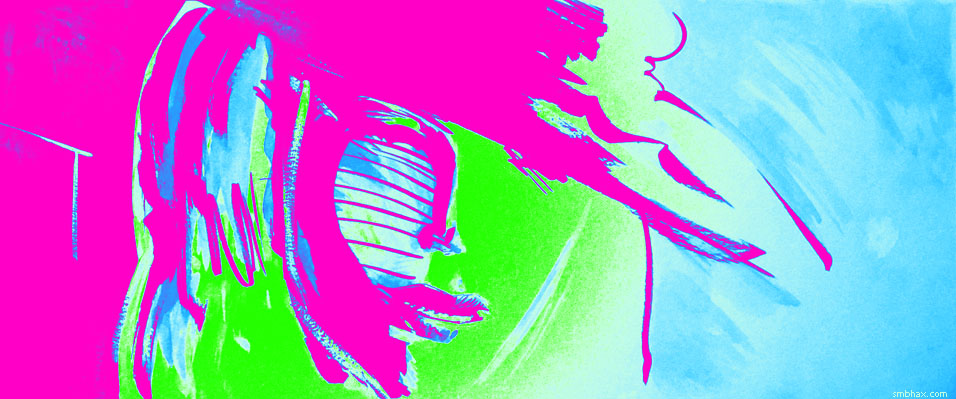
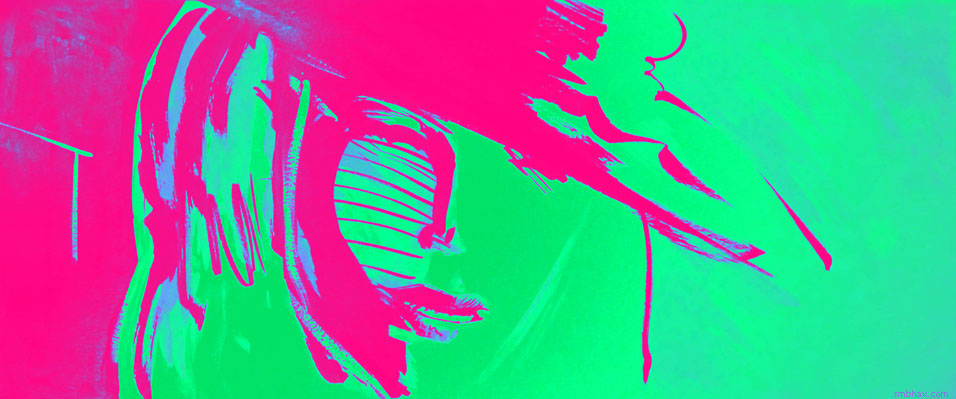
Added 1 new A* page:Just kept mixing and matching wacky stuff over a photo of the pencil and ink wash illustration in Photoshop until crazy colors came out for today's page. The final combo goes something like this:
|
·····
|
| |
| Please smoke responsibly | Dec 05, 2012 6:37 AM PST | url |
| | |
Added 1 new A* page:Tried doing the color thing I did accidentally yesterday, but now more on purpose. I think I should've kept the modelling of the fingers flatter--it got a bit mushy in there with ~3 layers of wash trying to show folds of skin--but I was able to control the lighting effect and the color tint a bit, so that's some progress.
I guess technically A* is a photo comic at the moment :P; the page came from a less processed, more tightly cropped, higher resolution version of this photo (from the "original art" link under the comic):
Layer on some Levels adjustment layers, a Brightness/Contrast layer to pop the latent slight yellow lighting color, a tinted color layer to move the yellow more toward red for this particular shot (it's supposed to be the stubbing out of the Major's cigar, you see), and a Hue/Saturation layer to desaturate it just slightly after all that, and voila. The whitish glow at the end of the cigar is mostly just the natural reflection of my room's ceiling light off the paper as I took the photo; this time I rotated the paper on my drawing board to get the highlight to fall on the right part of the drawing (yesterday's should really have been turned around to get the light to fall on the right hand side of the image rather than the upper left (the ceiling light is above and just over my left shoulder as I sit at my drawing board), but when I took that photo I had no idea the normally very faint highlight from my ceiling light would be playing such a role in the final version).
Hm yeah I'd do the curved shading on the fingers and the inside of the ashtray a bit different now that I've seen how this came out. Ah well, there's always tomorrow!
|
·····
|
| |
| Fool's gold | Dec 04, 2012 3:30 AM PST | url |
| | |
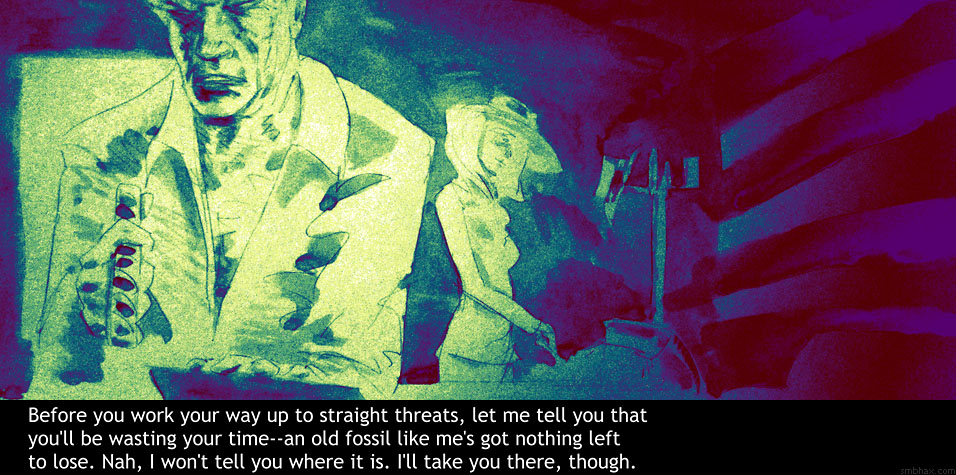
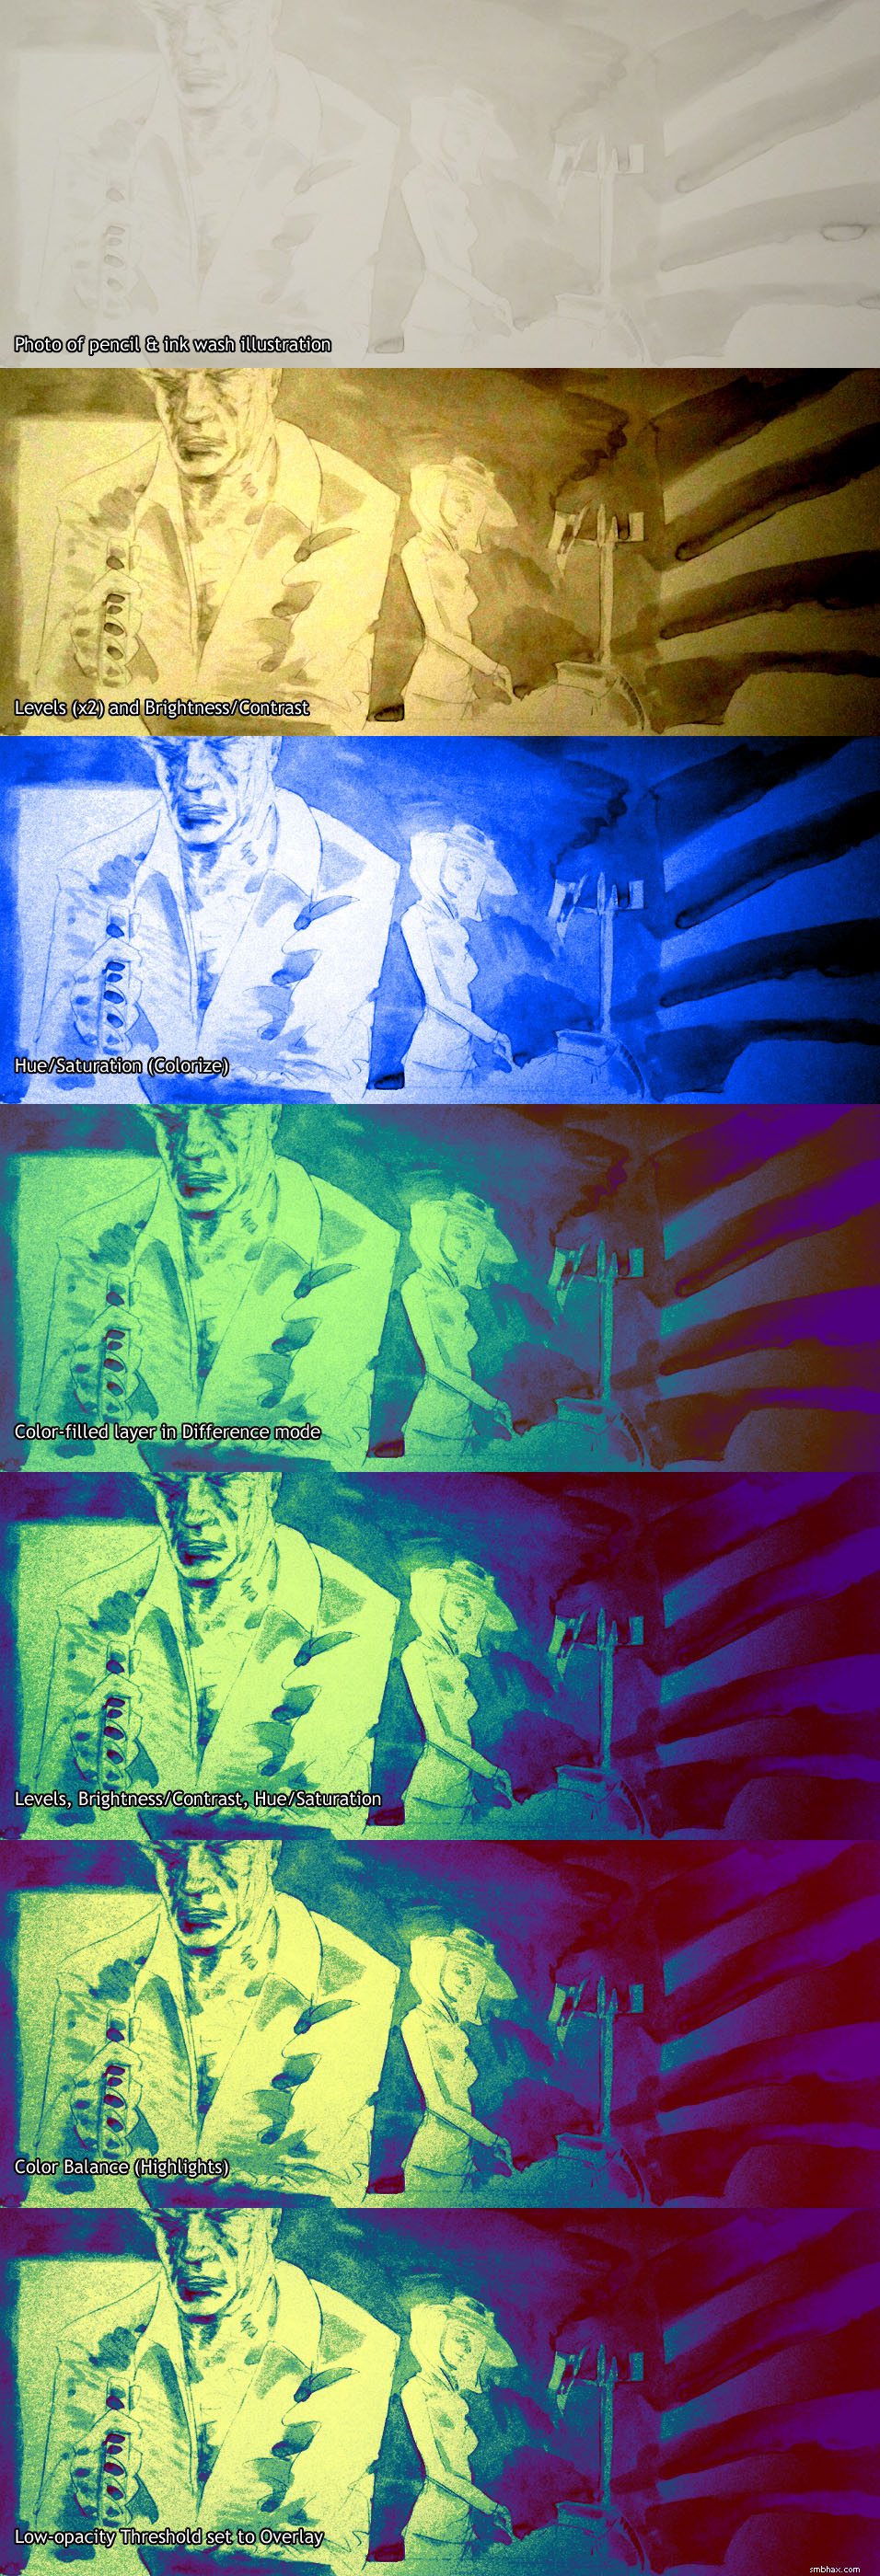
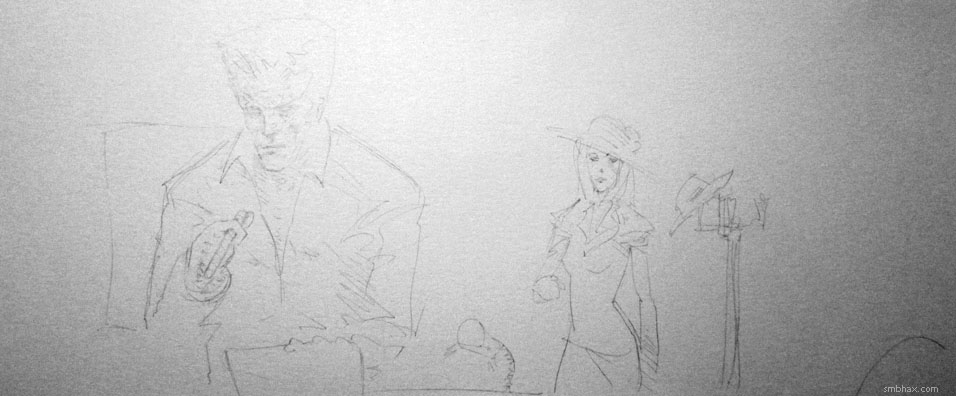
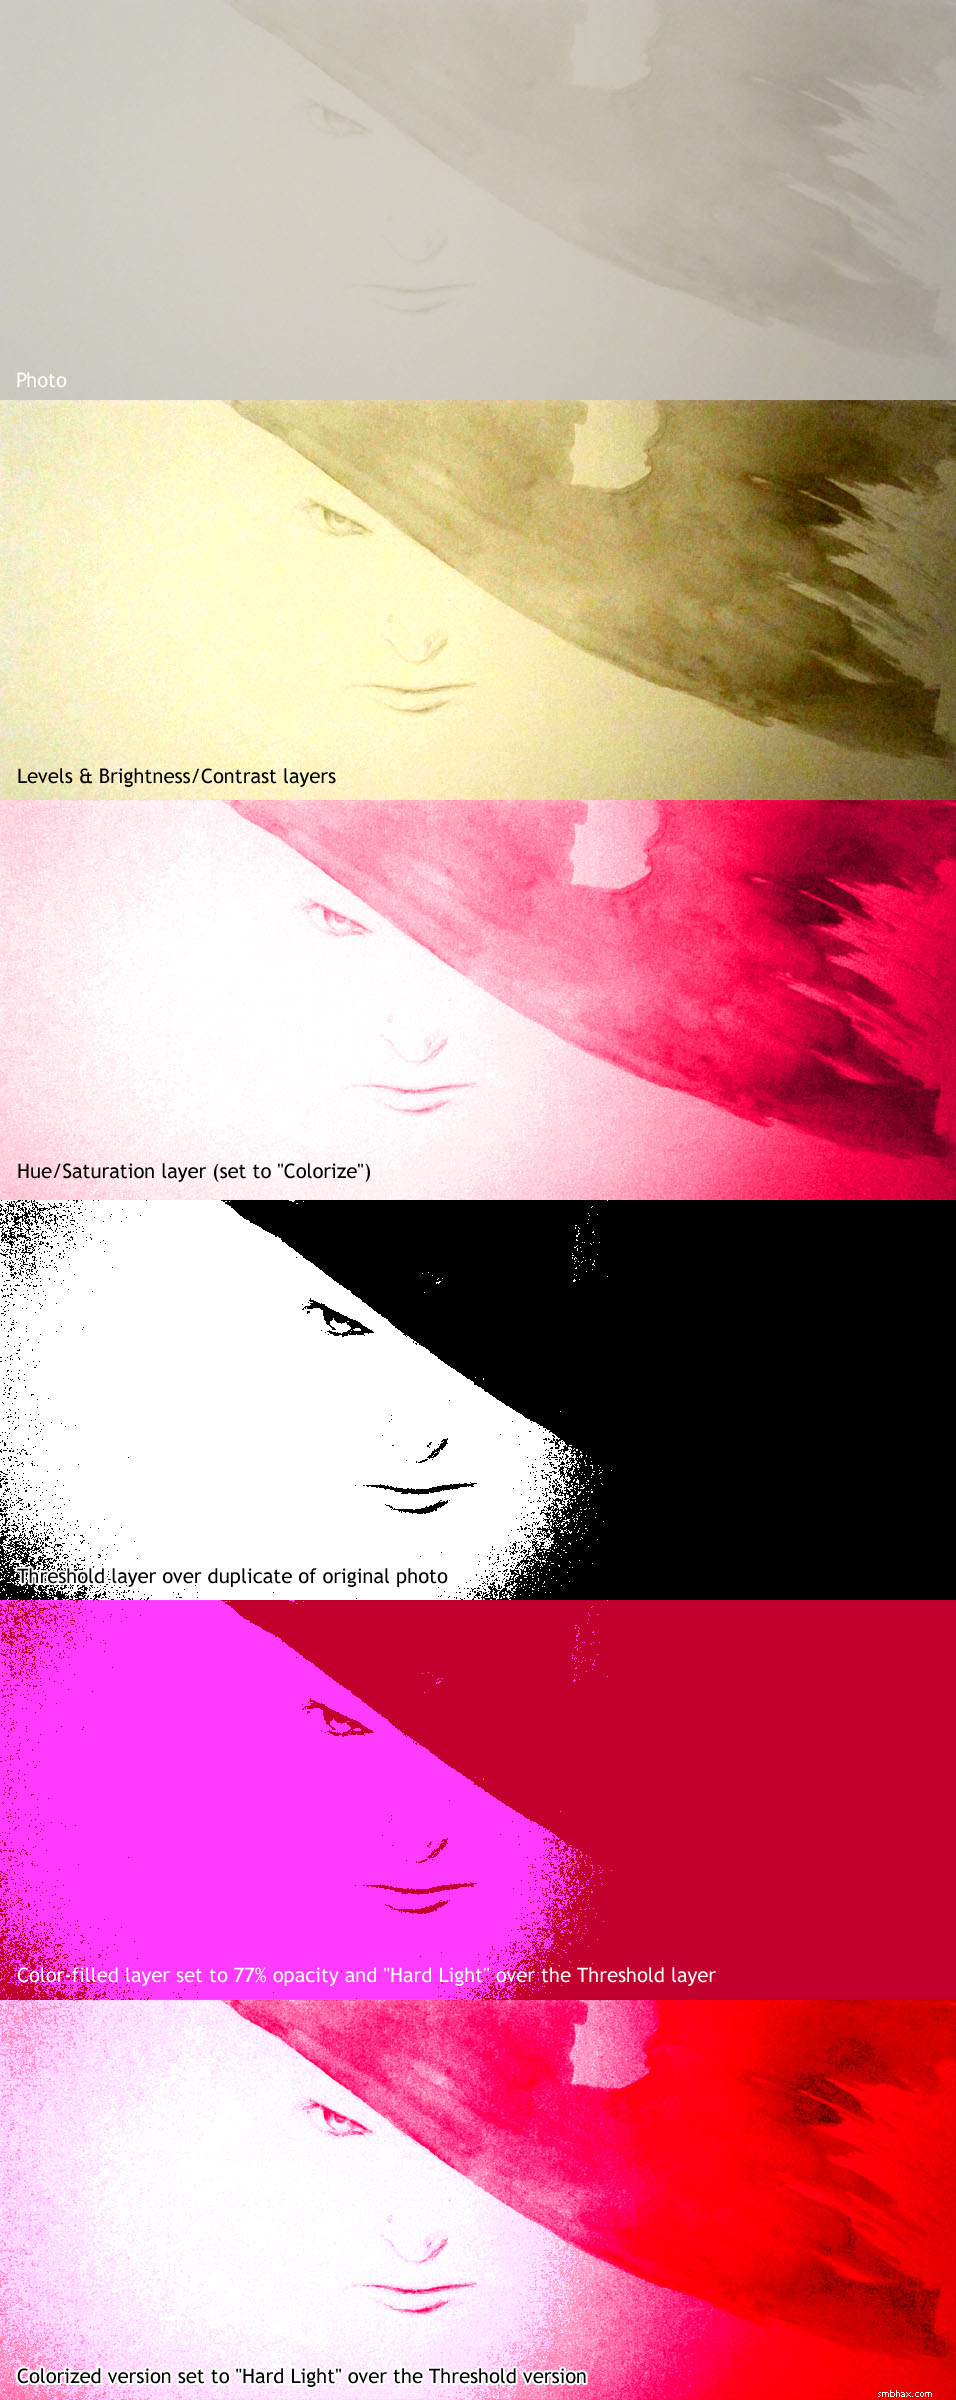
Added 1 new A* page:Uh. Hm. So over the weekend I got an awful itch to try going back to using gray ink washes, only I thought I came up with a way to do them that would solve some of the things that were irritating me the last time I stopped using them. I did a test sketch and that turned out pretty well (I'll scan it in when I get a chance), so naturally when I try to do a real A* page using the same method, it goes to heck. I had a snapshot of an early stage--when it was just a very light wash over pencil, with no erasing yet--which was the point where I was happiest with the thing; after that I tried to make it darker so it would reproduce well and be readily visible and all that, and it just didn't work; I can't figure how to get the subtle gradations I had in the light wash in a darker wash--I tried a dark wash version from scratch and it was hideous...although that may have been the fault of fatigue and frustration. Well anyhow, I poked at the photo of the early stage for a while in Photoshop, finally got a bit of contrast out of it without wrecking the nice subtle shades too badly, and behold and lo, when I threw those adjustment layers onto the original, color photo, it turned gold. Gold! Plus all that weird multicolor cheap photo noise was there too.
I don't think this is going to be a regular process... Hum. What will I do with tomorrow's? I have no idea! Come back and find out!
|
·····
|
| |
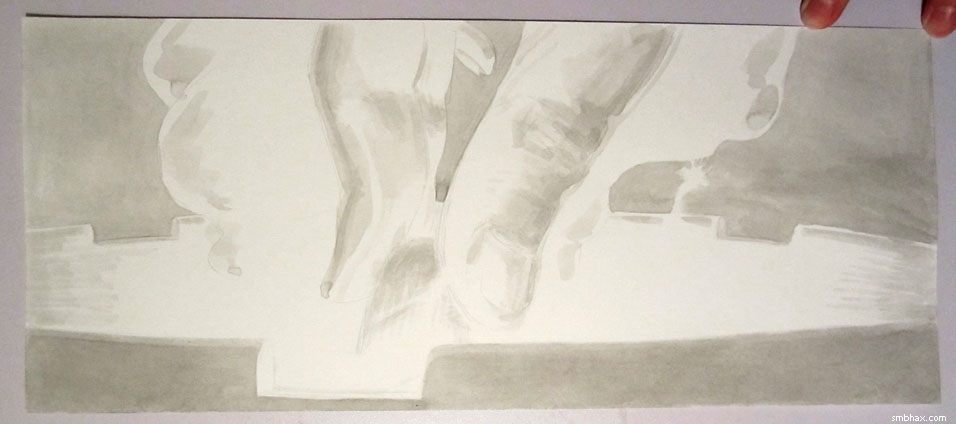
| The vortex of Saturn's hexagonal polar storm | Dec 01, 2012 8:40 AM PST | url |
| | |
Added 1 new A* page:A hexagonal storm 8,600 miles on a side surrounds the north pole of Saturn; heretofore that pole had been shrouded in night, so the storm could only be seen in rather blurry infrared photos taken by the orbiting Cassini probe; now, however, the Sun has reached the pole, and Cassini has been able to snap some vivid close-ups of the vortex at the center of the mysterious storm--a whirling hurricane perhaps some 1000 miles across:
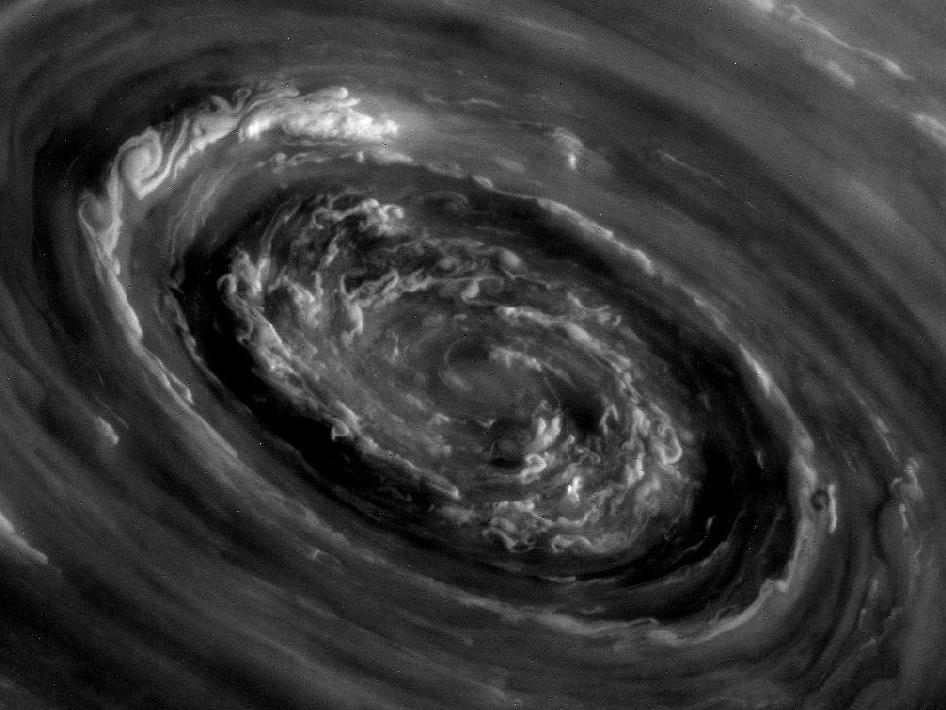
image by NASA/JPL-Caltech/Space Science Institute (source)
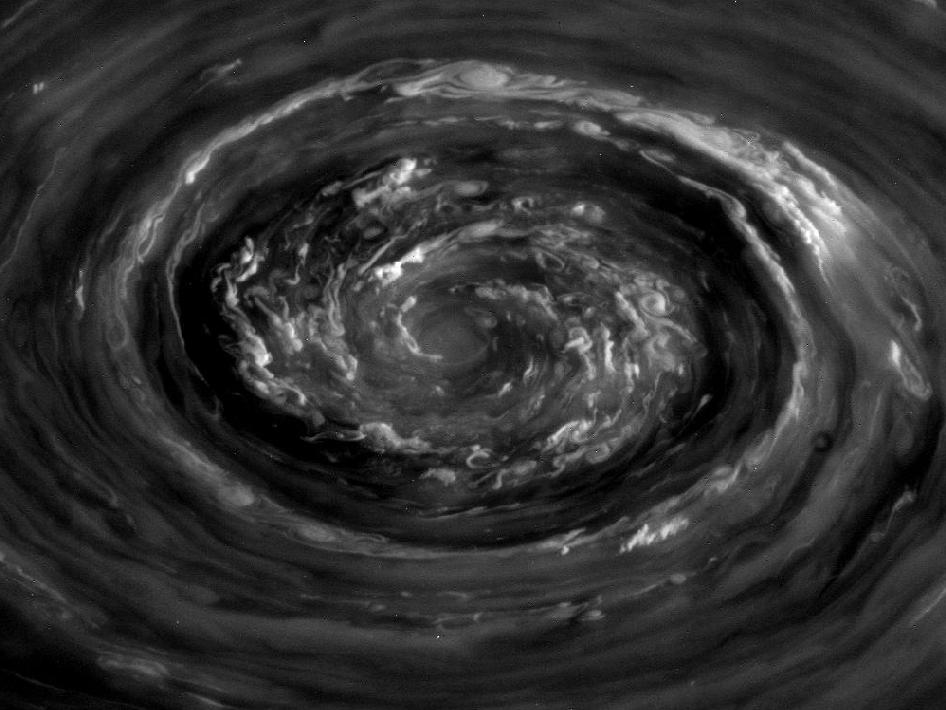
image by NASA/JPL-Caltech/Space Science Institute (source)
And a wider view:
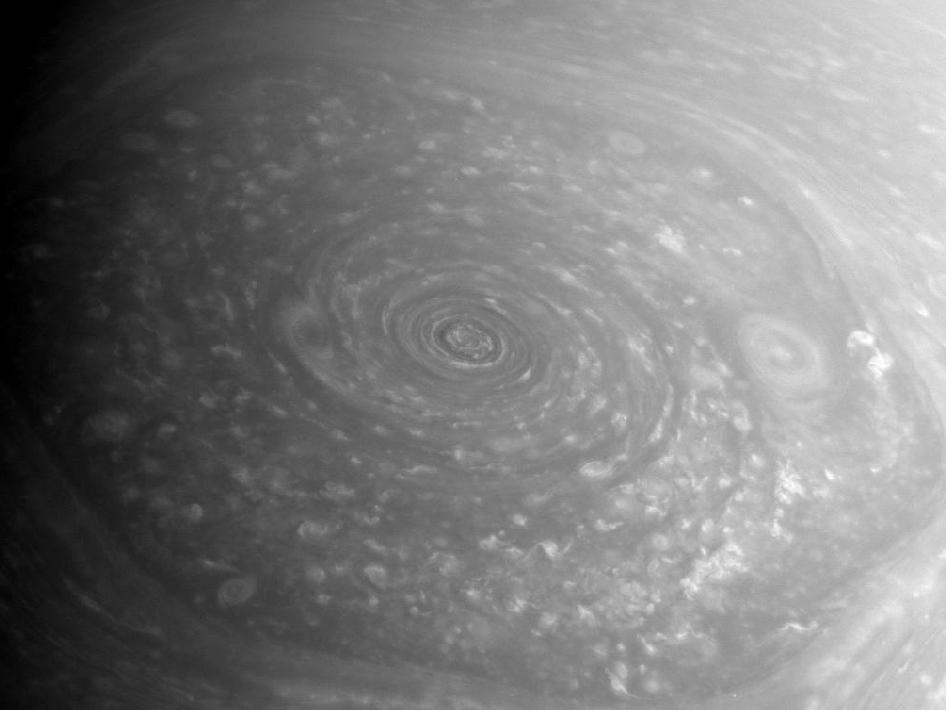
image by NASA/JPL-Caltech/Space Science Institute (source)
You can compare those against the infrared Cassini photo I posted when I talked about the storm back in January. The reason for the hexagonal shape is still a mystery! Here's NASA's article on the new photos.
|
·····
|
|
|