Added 1 new A* page:Boy, the eggnog or turkey or something nearly *did* finish me off, but uh well I'm still here. Whew. And anyway I just had to get this Proctor beefcake up for you all to enjoy.
Hm I was gonna knock off fast but I am feeling better now so I'll just go ahead with the little tutorial on how to draw the ugly stars I made a few pages ago. Ready? Here goes...
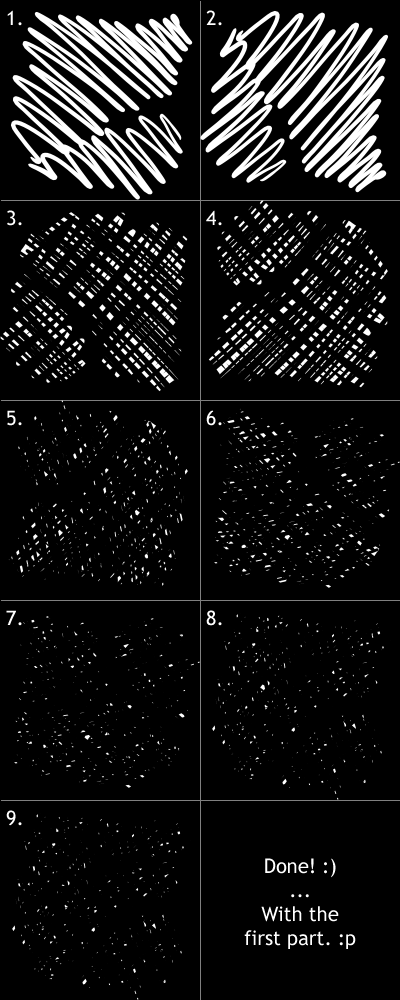
1) In your layer-supporting drawing program of choice (I'm using GIMP and its "Ink" brush tool), make a blank layer over a black background, set the new layer to "Screen" blending mode, and draw a white squiggle in it.
2) Rotate the canvas 90 degrees.
3) Squiggle on that same layer, but in black this time (remember, this layer needs to be on "Screen," otherwise the black squiggles will block stars or other things on layers beneath this one, which we don't want).
4) Rotate by another 90 degrees!
5) Squiggle in black again; you're now working at 180 degrees from your initial white squiggle, so you may want to vary your drawing angle just a bit to avoid overlapping your original lines too closely. Now we're starting to get some nice scattered stars. Don't go too heavy here or you'll end up with too few stars to make this worthwhile.
6) Rotate another 90 degrees.
7) You should have your stars pretty isolated by now; you'll go over it in black here again, but just picking areas where the stars look like they're all chopped out of a line: knock a few more out until they start to look properly scattered.
8) Rotate another 90 degrees.
9) Now we're back to our original "upright" position. Check for anything that still looks like a row of stars, and knock a few stars out of it.
You're done! With one layer. It's okay if you can still see a faint diagonal grid pattern in the stars here, because you're going to repeat the whole process eh four times or so to build up a bunch of overlapping star layers: I usually do two or three layers with the squiggle over the same spots where I want sort of bands of thicker stars; I've also been doing one layer that pretty much covers the whole background, to give a nice overall coverage.
When the stars are built up enough, I'll go in with black on a new layer over them to carve out clouds of gas blocking some of them and so forth...well I'm not going to try to tutorialize all of that now! Oh and I'll also draw in a few stars by hand where I want a few nice larger ones or clusters or whatnot, and I also vary the opacity of the background star layers, from 80-100%, which adds a sense of depth to the star field.
The result of all that work is a pretty dense cluster of stars that doesn't have the "someone placed a bunch of dots here" look that's sometimes hard to avoid when you just draw all the stars one by one. On the other hand, these scribble stars can be a little ugly, but if you kind of squint at 'em, I think they look a bit more photo-realistic, actually, than a lot of dotted stars. *My* dotted stars, anyway. Bah! Well I'm not all that great at drawing stars, but I'll probably be using this method until I can find a better one. :P
|